

You inflate one tyre before work, but the pressure warning appears again two or three days later. There is no obvious nail in the tread, the tyre looks fairly normal, and you may even have had it replaced recently. This frustrating pattern can be an early sign of tyre valve failure, although the valve is not the only possible cause. Air can also escape through a small tread puncture, the tyre bead, corrosion around the wheel or a crack in the rim. That is why guessing the cause and repeatedly adding air is not a proper solution. A slow leak may feel harmless because the tyre does not become flat immediately, but the pressure can continue falling whenever the vehicle is parked or driven.
A leaking valve can sometimes release air so slowly that the driver notices only when the TPMS warning returns. In other cases, a damaged valve can hiss loudly and deflate the tyre within minutes. The urgency depends on the condition of the valve, the speed of the leak and whether the tyre has already been driven underinflated. A visibly soft, flat or unstable tyre should not be driven because continued movement can damage its internal structure. This guide explains the early signs of tyre valve failure, how the valve works and why a complete wheel inspection matters. It will also help you understand when the problem needs mobile assistance rather than another temporary top-up.
What Is a Tyre Valve and Why Is It So Important?
A tyre valve is the small component used to inflate the tyre and keep pressurised air sealed inside it. It may look insignificant beside the tyre and wheel, but it performs an essential job every second the vehicle is moving or parked. Think of it like the tap fitted to a water pipe. The pipe may be perfectly sound, but a damaged seal inside the tap can still allow water to escape continuously. In the same way, a healthy tyre can lose air if the valve core, stem or base seal has deteriorated. The leak may begin as a barely noticeable whisper before developing into repeated pressure loss.
Correct tyre pressure supports steering response, braking stability, fuel efficiency and even tyre wear. When pressure falls, the sidewall bends more than it was designed to, producing heat and unnecessary internal stress. Drivers can learn more about these wider effects in our guide explaining how under-inflated tyres affect your vehicle. Tyre valve failure should therefore be treated as more than a small inconvenience. The valve may be inexpensive compared with a tyre or wheel, but ignoring the leak can turn a relatively simple repair into a more expensive replacement. Early diagnosis is the sensible option, especially when the same wheel repeatedly needs air.
What Are the Main Parts of a Tyre Valve?
The visible section outside the wheel is known as the valve stem. Inside that stem sits the valve core, a small spring-loaded component that opens when an inflation nozzle is attached and closes when the nozzle is removed. The valve cap fits over the opening and helps protect the core from dirt, moisture and road contamination. It acts as secondary protection, but it is not supposed to be the main air seal. A missing cap does not normally make a healthy tyre instantly flat. However, leaving the core exposed can allow grit and moisture to interfere with its sealing surface over time.
The base of the valve creates a seal where the stem passes through the wheel. On a standard rubber valve, the flexible body normally seals against the valve hole in the rim. Metal and TPMS-connected valves may use washers, grommets, nuts or other serviceable sealing parts. A leak can therefore develop at the valve opening, through a cracked stem or around the point where the valve meets the wheel. These faults do not always require the same repair. Replacing a valve core will not solve a crack at the base, just as fitting a new cap will not repair a corroded metal stem.
Standard Rubber Valves, Metal Valves and TPMS Valves
Many vehicles use rubber snap-in valves that are pulled securely into the wheel during tyre fitting. Rubber remains flexible, which helps it seal against the wheel, but years of heat, movement, road dirt and weather exposure can make it brittle. Small cracks may appear when the stem is gently moved during inflation. Metal clamp-in valves use a more rigid construction and normally seal through fitted washers or grommets. They can resist some forms of physical movement better than rubber, but moisture and road salt may eventually cause corrosion around the stem or retaining parts.
Vehicles with direct tyre pressure monitoring often have an electronic sensor mounted inside the wheel. The visible valve may be connected to that sensor, but the valve and electronic unit should not automatically be treated as one inseparable component. Sometimes the stem, seal, washer or service kit is faulty while the sensor itself continues working normally. In other cases, the sensor battery or electronics may have failed even though the valve is not leaking. Our mobile TPMS valve replacement service covers inspection of compatible rubber and metal valve systems at the vehicle’s location. Correct diagnosis matters because replacing a complete sensor when only a seal has failed creates unnecessary cost.
What Are the Signs of Tyre Valve Failure?
The most common sign of tyre valve failure is repeated pressure loss in one wheel. You may inflate the tyre to the vehicle manufacturer’s recommended pressure, only to find it low again several days later. A faint hissing sound near the valve can indicate escaping air, while visible cracking or corrosion suggests that the component has physically deteriorated. Continuous bubbles around the core or base during a careful soapy-water check can also reveal a leak. However, these signs should not be viewed in isolation because a puncture, leaking bead or damaged wheel can produce similar symptoms.
Some warning signs require more urgent action than others. A tyre that loses a small amount of pressure over several weeks still needs inspection, but a strong hiss or visibly collapsing sidewall suggests faster deflation. A recurring TPMS warning should also be investigated rather than repeatedly reset or ignored. Drivers sometimes assume that a warning light means the electronic sensor has failed, but it may simply be reporting genuine pressure loss. The table below helps separate common symptoms by urgency. It is a guide for initial understanding, not a substitute for examining the complete tyre, valve and wheel.
| Symptom | What It May Indicate | Recommended Action |
|---|---|---|
| One tyre loses pressure over several days | Small valve, puncture or bead leak | Arrange a full leak inspection |
| Bubbles form at the valve opening | Possible valve-core leak | Have the core checked promptly |
| Bubbles form around the valve base | Stem, seal or grommet failure | Valve replacement may be required |
| A strong hissing sound is present | Rapid air loss | Do not continue driving |
| The stem is cracked, bent or corroded | Physical valve damage | Arrange immediate inspection |
| The TPMS warning keeps returning | Genuine pressure loss or system fault | Measure pressure and diagnose the cause |
| The tyre looks soft or completely flat | Significant pressure loss | Stop driving and request assistance |
One Tyre Keeps Losing Pressure
Repeated pressure loss in the same tyre is one of the clearest signs that something needs attention. Normal temperature changes can cause small pressure variations across several tyres, especially when the weather becomes colder. They do not usually explain why one wheel repeatedly loses much more air than the others. If you keep reaching for the inflator every weekend, the vehicle is effectively telling you that the leak has not been repaired. The source may be the valve core, the stem, the tyre bead, a puncture or the wheel itself. Repeated inflation can hide the symptom temporarily, but it does not stop the air escaping.
This problem is especially confusing when the tyre is new. Drivers often assume that a recently replaced tyre cannot have a pressure problem, yet the original valve may still be damaged or the wheel may not be sealing correctly. Corrosion around the rim can create tiny channels through which air slowly escapes. A TPMS sealing part may also have been disturbed or may already have deteriorated. The correct response is to request a full wheel-leak inspection rather than automatically purchasing another tyre. Accurate diagnosis protects both your safety and your budget.
Hissing, Cracks and Corrosion Around the Valve
A hissing noise is produced when pressurised air escapes quickly enough to be heard. It may come from the valve opening, the stem or the area where the valve meets the wheel. If the sound is strong and the tyre is visibly becoming softer, the vehicle should not be driven. The valve should never be bent, pulled or twisted in an attempt to make the noise stop. That may enlarge an existing crack or disturb a weakened seal. A mobile technician can inspect the valve safely and determine whether the core, complete stem or another component has failed.
Visible cracking is more common on ageing rubber stems, particularly where the valve repeatedly flexes during inflation. Metal valves may show white, green or brown corrosion around the stem, retaining nut or wheel surface. The damage can feel rough beneath the fingertips and may worsen after exposure to winter salt and moisture. A missing or damaged cap should also be replaced because it allows contamination to collect around the core. However, fitting a new cap does not repair an active leak. Any visible deterioration combined with pressure loss should be treated as evidence that professional inspection is needed.
TPMS Warnings and Changes in Vehicle Handling
A TPMS warning is often the first sign the driver notices because the valve itself is easy to overlook. The warning may appear after the vehicle has been parked overnight, during a cold morning or partway through a journey. A steady warning commonly means that one or more tyres may be below the required pressure. A flashing warning followed by continuous illumination can indicate a monitoring-system fault on some vehicles. Neither pattern proves that the valve has failed. Actual tyre pressures should be measured before blaming the valve or electronic sensor.
As pressure continues falling, the vehicle may begin to feel different through the steering wheel. The steering can feel heavier, the car may pull slightly to one side, and the affected tyre can produce a duller sound against the road. These changes are sometimes subtle, like walking with one shoe that has a softer sole than the other. By the time the sidewall looks visibly compressed, the tyre may already be operating far below its intended pressure. Stop somewhere safe if the handling changes suddenly or the tyre appears soft. Tyre valve failure is often repairable, but continuing to drive can damage a tyre that might otherwise have remained usable.
What Causes a Tyre Valve to Fail?
Tyre valves rarely fail without a reason. Age, heat, road salt, moisture, impact damage and incorrect fitting can gradually weaken the valve or its sealing components. The failure may begin with a tiny gap that releases only a small amount of air overnight. Over time, that gap can widen until the tyre needs inflating every few days. The frustrating part is that the tyre itself may still look completely healthy. You can inspect the tread, find no nail, and still hear the soft whisper of air escaping near the wheel.
The exact cause often depends on the type of valve fitted to the vehicle. A standard rubber valve may crack or perish, while a metal TPMS-connected valve may develop corrosion around its seals or retaining parts. The valve core can also become loose, dirty or damaged regardless of the stem type. Poor installation may create a leak immediately, while ageing components can work normally for years before suddenly deteriorating. This is why a proper inspection should examine the core, stem, base seal, tyre bead and wheel rather than replacing the first component that looks suspicious.
Rubber Ageing, Heat and Repeated Flexing
Rubber tyre valves bend slightly whenever an inflation nozzle is pushed onto them. That movement is normal when the valve is new and flexible, but repeated bending eventually places stress around the base. Heat from the brakes, sunlight, changing temperatures and road contamination can make the rubber hard and brittle. Imagine an old elastic band left near a sunny window. It may appear intact until you stretch it, then small cracks suddenly become visible. A tyre valve can deteriorate in a similar way.
Cracking often develops close to the wheel, where the stem experiences the most movement. The damage may be difficult to see while the valve remains still, but it can open when the inflation hose pulls against it. Drivers sometimes discover the leak only after checking their pressure because the valve begins hissing when moved. This does not mean pressure checking caused the original damage. It normally means the rubber was already weakened. A cracked stem should be replaced rather than pushed back into position or covered with sealant.
Moisture, Road Dirt and Corrosion
Metal valves and TPMS-connected assemblies can suffer from corrosion, particularly after repeated exposure to rain, winter salt and road grime. Moisture can collect around the retaining nut, washer, valve hole or sealing surface. The metal may gradually develop a rough, powdery coating that prevents the components from sealing correctly. In severe cases, the stem itself can become weak and snap during inflation. A valve may look solid from a distance while corrosion is quietly spreading underneath the visible hardware.
Alloy wheels can also corrode around the valve hole or tyre bead seat. This is important because replacing the valve alone may not solve the leak when the wheel surface is damaged. The technician may need to clean and assess the sealing area before fitting new components. If the corrosion is too severe, wheel repair or replacement may be necessary. This is one reason repeated pressure loss should be investigated rather than treated with endless top-ups. The escaping air may be revealing a wider wheel-sealing problem.
Valve-Core, Impact and Installation Problems
The valve core is the small internal seal that opens during inflation and closes when the nozzle is removed. Dirt, moisture or physical damage can prevent it from closing completely. A core may also leak if it is loose, but blindly tightening it is not a safe universal solution. Excessive force can damage the core or the threads inside the stem. If bubbles form directly over the valve opening, the core should be inspected with the correct tools rather than twisted until the sound disappears.
Impact and fitting errors can also cause tyre valve failure. A kerb strike, pothole, poorly positioned inflation nozzle or careless handling during tyre work may bend the stem or damage its seal. TPMS valves can be particularly sensitive because the external stem may be connected to an electronic sensor inside the wheel. Reusing old sealing parts or applying incorrect tightening force can create another leak after fitting. Good diagnosis therefore includes asking when the pressure loss began, especially if it appeared immediately after a tyre change or wheel repair.
Is the Air Leak Coming From the Valve, Tyre or Wheel?
A tyre that keeps losing pressure does not automatically have a faulty valve. Air can escape from several locations, and the symptoms often feel almost identical from the driver’s seat. A small tread puncture may release air at the same slow rate as a damaged valve core. A corroded bead seat can also allow pressure to fall gradually without leaving an obvious object in the tyre. Even a cracked wheel can remain hidden on the inner rim, where the driver cannot see it during a basic roadside check.
The safest approach is to treat repeated pressure loss as a wheel-system problem until the exact source is confirmed. The tyre, valve, wheel and TPMS components work together to contain pressure. Replacing one part without checking the others is like replacing a door lock when the gap is actually coming from a warped frame. The new lock may work perfectly, but the door still will not seal. A complete inspection prevents this type of unnecessary repair and helps protect a tyre that may still be usable.
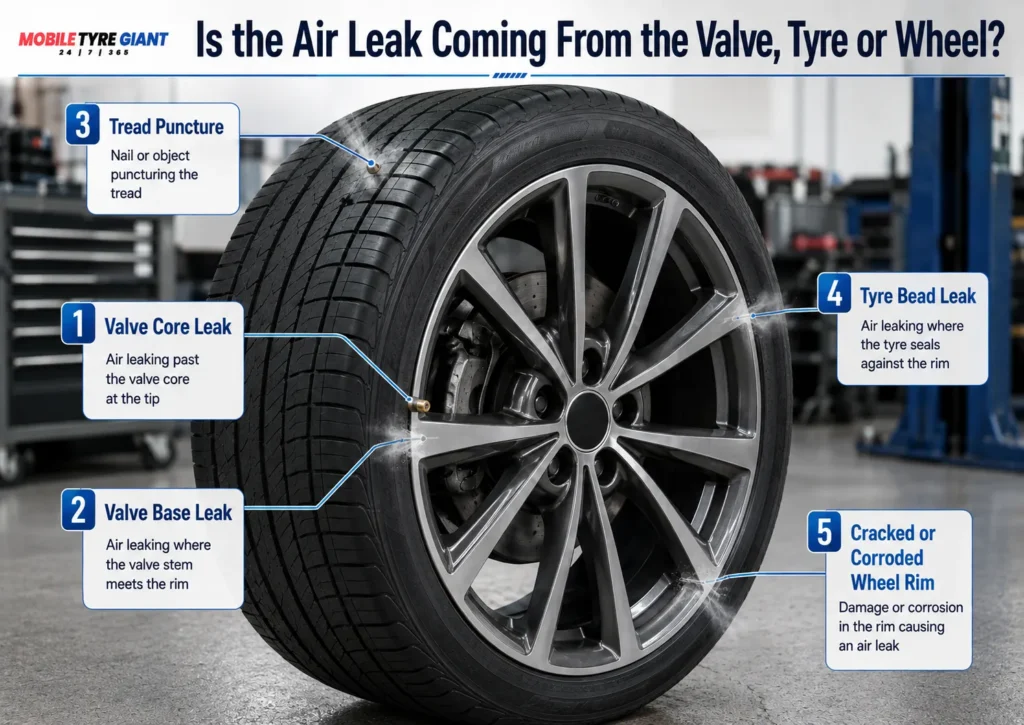
Valve-Core and Valve-Base Leaks
A valve-core leak normally releases air through the opening at the end of the stem. During a careful bubble test, foam may slowly rise over the valve tip even when the stem is not being touched. A faint hiss may also be noticeable in a quiet location. This fault can sometimes be corrected by servicing or replacing the core. However, the technician should still check the stem because two faults can exist at the same time.
A valve-base leak appears where the stem enters the wheel. Bubbles may form around the rubber base, metal washer or sealing grommet rather than at the valve opening. This usually means the complete valve, seal or service component requires attention. Replacing only the core will not repair a split stem or damaged base seal. The tyre bead normally needs to be released so the valve and inner wheel surface can be inspected properly.
Tread Punctures, Bead Leaks and Wheel Damage
A tread puncture commonly develops after a nail, screw or sharp road object enters the tyre. The object may remain embedded and slow the air loss, making the problem appear minor. Small bubbles may form around the damaged tread when leak-detection solution is applied. Whether the tyre can be repaired depends on the puncture position, size, angle and internal condition. Sidewall and shoulder damage normally requires a different decision from a small repairable tread puncture.
A bead leak occurs where the tyre seals against the wheel rim. Corrosion, dirt, old sealant, impact damage or poor tyre seating can create a narrow escape path for air. A cracked or bent wheel can produce similar pressure loss, particularly after a heavy pothole impact. These faults may be almost invisible while the wheel remains on the vehicle. That is why a new tyre can still lose air. The rubber may be new, but the valve, bead seat or wheel underneath may still be damaged.
Drivers can perform a few basic checks, but these should be treated as indicators rather than final diagnosis. Begin when the tyre is cold and the vehicle is parked safely on level ground. Measure the pressure with a reliable gauge and compare it with the manufacturer’s recommended figure. This information is normally shown inside the driver’s door area, fuel flap or vehicle handbook. Do not use the maximum pressure printed on the tyre sidewall as the normal operating target. Record the reading so you can see how quickly the pressure changes.
Next, inspect the valve without pulling, twisting or bending it. Look for cracks, corrosion, missing caps, damaged threads and obvious movement around the base. Listen closely in a quiet environment for any hissing sound. The tyre tread, sidewall and visible wheel rim should also be checked for nails, cuts or impact damage. If the tyre is visibly soft or flat, do not continue testing by driving the car. Arrange professional assistance instead.
Using Soapy Water as an Initial Leak Indicator
A simple mixture of water and washing-up liquid can help reveal escaping air. Apply a small amount around the valve opening and then around the point where the stem meets the wheel. Watch carefully for continuously growing bubbles rather than foam created during application. A core leak usually produces bubbles at the tip, while a base leak tends to appear lower down. Very slow leaks may take a little time to become visible, so a quick glance can miss them.
The same test can be applied carefully around a suspected tread puncture and the tyre bead. However, finding bubbles at one location does not prove there are no other faults. A tyre may have both a leaking valve and internal damage from being driven underinflated. The test also cannot confirm whether a puncture is safely repairable. It should help you describe the problem when arranging assistance, not encourage you to dismantle or repair pressurised components yourself.
Why a Complete Professional Inspection Still Matters
A mobile tyre technician can check areas that are difficult or impossible to assess while the wheel remains fitted. This may include the inner tyre surface, the complete bead, the rear of the wheel and the TPMS sensor assembly. The tyre may need to be removed so the technician can look for abrasion, cracking, heat damage or weakened internal cords. These problems are not always visible from outside. A tyre that appears normal can still be unsafe after being driven with very low pressure.
Professional inspection also prevents unnecessary replacement. If only the core has failed, the tyre and sensor may remain usable. If the valve base is leaking, a new stem or service kit may solve the problem. If the wheel is cracked or badly corroded, replacing the tyre alone will not stop the pressure loss. The goal is not simply to stop bubbles for the moment. It is to identify why the air escaped and restore a safe, lasting seal.
Can You Drive With a Leaking Tyre Valve?
Driving with a leaking tyre valve is not automatically safe just because the tyre still contains some air. The real decision depends on how quickly pressure is escaping, how the vehicle feels, and whether the tyre has already been damaged. A faint leak discovered while the car is parked at home is different from a valve that is hissing loudly beside a visibly collapsing tyre. Even a slow leak can become more serious without warning if the stem splits further or a weakened seal moves. The safest response is to check the tyre promptly rather than treating repeated inflation as normal maintenance. You should not begin or continue a journey if the tyre looks soft, the steering feels unusual, or the pressure drops soon after inflation.
A leaking valve can reduce the tyre’s ability to support the vehicle correctly. As the sidewall flexes more deeply, heat builds inside the tyre and places stress on its internal structure. You may notice heavier steering, a slight pull to one side, or a dull thumping sound that becomes clearer as speed increases. These sensations are like walking with one shoe gradually losing its sole, because the whole vehicle begins to feel uneven. Continuing to drive may damage a tyre that could otherwise have been saved by a straightforward valve repair. For wider guidance on the risks involved, read our explanation of driving with a flat tyre.
When the Vehicle Should Not Be Driven
Do not drive when the tyre is visibly flat, the sidewall is heavily compressed, or air is escaping fast enough to hear clearly. A snapped, severely bent or badly cracked valve should also be treated as an immediate stop-driving condition. The same applies if the vehicle feels unstable, pulls strongly, vibrates or responds unusually through the steering wheel. These signs suggest that the tyre may no longer be supporting the vehicle safely. Driving even a short distance can grind the sidewall between the road and wheel rim. That damage may destroy the tyre internally, even if the outside still looks repairable afterward.
The location also affects the decision. Moving a vehicle a few metres away from immediate danger may sometimes be necessary, but that is not the same as driving several miles to a garage. If the car is already in a safe driveway, workplace car park or lay-by, leave it there and arrange assistance. Do not risk a journey simply because the repair appears inexpensive. The cost of a valve is small compared with a ruined tyre, damaged wheel or loss of vehicle control. When in doubt, stop using the vehicle until the pressure loss has been assessed.
Why There Is No Universal Safe PSI
Drivers often search for one pressure figure that supposedly makes a leaking tyre safe to drive. That figure does not exist because recommended pressures vary by vehicle, tyre size, axle load and driving conditions. A pressure that is normal for one car may be dangerously low for another. The speed of the leak matters as much as the reading itself. A tyre inflated to the correct figure could lose several pounds of pressure within minutes if the valve is badly damaged. A single gauge reading therefore provides only a snapshot, not proof that the tyre will remain safe throughout the journey.
The manufacturer’s cold-pressure recommendation should always be the starting point. It is normally displayed on a label inside the driver’s door, fuel flap or owner’s handbook. However, restoring the correct pressure does not repair the leaking component. If the reading falls again quickly, the vehicle should not be driven. Weather changes may cause small pressure variations, but they do not explain rapid or repeated loss from one wheel. Focus on the tyre’s condition and leak rate rather than looking for an internet number that promises safety.
Why Repeated Reinflation Is Not a Repair
Adding air can temporarily restore the tyre’s shape, but it does not remove the cause of the leak. Many drivers fall into a routine of inflating the same tyre every few days because the car appears normal afterward. That habit can continue for weeks until the leak suddenly becomes faster. Each period of underinflated driving generates extra sidewall movement and heat. The tyre may look healthy from outside while the inner sidewall is becoming scuffed, weakened or separated. By the time the problem is finally inspected, valve replacement alone may no longer be enough.
Frequent top-ups can also hide how quickly the condition is worsening. A tyre that once lost pressure over two weeks may begin losing the same amount overnight. Recording the pressure can help identify the pattern, but it should not delay professional diagnosis. A portable inflator is useful for emergencies and pressure checks, not as a permanent treatment. Think of it like repeatedly filling a leaking bucket without repairing the hole. The water level returns briefly, but the underlying problem continues every second.
What Should You Do If a Tyre Valve Fails While Driving?
If a pressure warning appears or the vehicle begins feeling unstable, reduce speed smoothly and avoid sudden steering movements. Do not brake harshly unless traffic conditions make it necessary. Keep a firm but relaxed grip on the steering wheel and look for a safe place to stop. Suitable options may include a car park, service area, lay-by or emergency refuge area. Switch on the hazard lights if the vehicle is moving unusually slowly or has stopped where other drivers need warning. Once stationary, apply the parking brake and keep passengers away from live traffic.
Inspect the affected wheel only from a safe position. Look for a collapsed sidewall, obvious valve damage, strong hissing or a tyre that has separated from the rim. Do not kneel beside traffic or place yourself between the vehicle and moving vehicles. Avoid bending the valve to see whether the noise changes because a weakened stem may split completely. If the tyre is flat or losing air rapidly, leave the vehicle where it is safe and contact mobile assistance or recovery. Your first priority is protecting people, not proving exactly which component has failed.
Reduce Speed Smoothly and Stop Safely
Sudden movements can make an underinflated tyre harder to control. Lift off the accelerator gradually and allow the vehicle to slow without aggressive inputs. Check mirrors, signal early and move towards a safe stopping place when traffic conditions permit. If the steering feels heavy, do not fight it with sharp corrections. Keep movements gentle and predictable so the remaining tyres can maintain as much stability as possible. A tyre losing pressure may respond differently during cornering, braking and lane changes.
Once stopped, consider whether the location is suitable for repair work. A narrow road, blind bend or live motorway lane is not a safe workshop. Even a skilled technician cannot work safely when traffic passes within inches of the wheel. If the vehicle is in immediate danger, contact the appropriate emergency or recovery service and follow official roadside instructions. Do not attempt a wheel change where you or another person could be struck. A delayed repair is inconvenient, but unsafe roadside work can have far more serious consequences.
Check for Visible Deflation Without Touching the Valve
Stand far enough back to compare the affected tyre with the others. A noticeably lower body position, bulging sidewall or flattened contact area indicates significant pressure loss. Listen for hissing, but do not place your face close to the valve or tyre. Look for a broken cap, bent stem or metal valve sitting at an unusual angle. You may also notice a screw in the tread or damage around the wheel rim. These observations can help the technician prepare, but they should not tempt you into dismantling anything beside the road.
A tyre can be dangerously underinflated before it looks completely flat. Modern sidewalls may retain some shape even when pressure has dropped substantially. That is why visual inspection should be combined with a gauge reading only when it is safe and practical. Do not attach an inflator if the valve is cracked, loose or visibly damaged. Pressure from the hose may worsen the fault or cause the stem to separate. When the condition is uncertain, leave the wheel untouched and request professional help.
What Emergency Tyre Valve Options Are Available?
The correct emergency option depends on the location, leak rate, valve type and condition of the tyre. A mobile technician may be able to inspect the wheel, identify the leak and replace a standard or compatible TPMS valve at the vehicle’s location. If the tyre has a separate repairable puncture, that may also be addressed during the visit. When the tyre has been driven flat or suffered structural damage, replacement may be the only safe outcome. Severe wheel damage may require recovery or specialist wheel repair rather than roadside valve work. Diagnosis should always come before parts are replaced.
Mobile service is particularly useful when the vehicle is at home, work or in an accessible car park. It removes the need to drive on a tyre whose condition is unknown. Mobile Tyre Giant can assess the tyre, valve and wheel through its mobile tyre repair service, subject to safe access and the nature of the fault. The technician may discover that only the valve core has failed, or that the complete stem needs replacing. In other cases, pressure loss may come from the bead, tread or wheel rather than the valve. The important outcome is a safe repair based on evidence rather than assumption.
| Emergency Situation | Immediate Action | Likely Service Required |
|---|---|---|
| Slow pressure loss found at home | Avoid normal driving and arrange inspection | Mobile leak diagnosis |
| TPMS warning appears while driving | Reduce speed and stop safely | Pressure and valve inspection |
| Strong hissing from the valve | Do not continue driving | Emergency valve replacement |
| Valve is snapped or severely bent | Leave the vehicle stationary | Mobile assistance or recovery |
| Tyre is completely flat | Do not drive on it | Tyre inspection or replacement |
| New tyre still loses pressure | Request a complete wheel check | Valve, bead or rim diagnosis |
| Wheel appears cracked or badly bent | Avoid moving the vehicle | Recovery and wheel assessment |
Mobile Valve Inspection and Replacement
A mobile technician begins by confirming where the air is escaping. The pressure, valve core, valve base, tread, bead and visible wheel condition should all be checked. If the complete stem needs replacing, the technician will normally release the tyre bead to access the internal section safely. TPMS-equipped wheels may require compatible sealing parts and careful handling around the sensor. The work is more precise than simply pulling out the old valve and fitting another. Correct installation matters because poor sealing or damaged components can recreate the same problem.
After the valve work, the tyre should be reinflated to the vehicle’s recommended pressure and checked again for leakage. The technician may also need to inspect the tyre internally if it was driven while underinflated. Wheel balancing may be required when the tyre has been removed or disturbed, depending on the work completed. The driver should be told exactly what failed and whether any further action is necessary. Clear explanation prevents confusion between valve replacement, TPMS servicing and full sensor replacement. It also gives the driver confidence that the original leak has actually been addressed.
Spare Wheels, Recovery and Tyre Replacement
A suitable spare wheel may allow the vehicle to continue, but it should be fitted only in a safe location. Temporary spare wheels often have limits on speed and distance, so the manufacturer’s instructions must be followed. Do not assume that every vehicle carries a usable spare because many modern cars provide only an inflation kit. A sealant kit may not repair a cracked valve, failed base seal or corroded TPMS stem. It may also complicate later diagnosis if used without understanding the fault. Calling mobile assistance is usually the clearer option when the leak source is uncertain.
Recovery becomes the safest choice when the location is dangerous, the wheel is badly damaged or roadside work cannot be completed securely. Tyre replacement may also be necessary if the sidewall has been crushed, overheated or damaged through driving without enough pressure. This does not mean every leaking valve requires a new tyre. A sound tyre can often remain in service after the correct valve repair. The final decision should be based on internal and external inspection rather than the driver’s guess. Protecting the tyre early is one of the strongest reasons not to continue driving on a leak.
Can a Failed Tyre Valve Be Repaired?
Whether a failed tyre valve can be repaired depends on which part is allowing air to escape. A leaking valve core may require only a small replacement component, while a cracked rubber stem normally needs the complete valve changing. Metal TPMS valves can also develop faults around the grommet, washer, retaining nut, or stem. In some cases, compatible service parts can restore the seal without replacing the electronic sensor. However, the tyre bead usually needs to be released before the valve base and internal components can be accessed safely. This is why the repair should begin with a proper diagnosis rather than assuming every valve problem needs the same solution.
A technician should check the valve opening, stem, base seal, wheel surface, and tyre condition before recommending replacement parts. A new valve core will not repair a split stem, just as a new stem will not fix a cracked wheel. Pressure loss can also come from more than one location at the same time. For example, an ageing valve may leak while corrosion around the tyre bead creates another escape path. Repairing only the most visible fault could leave the driver facing the same pressure warning several days later. A lasting solution must address every confirmed source of air loss.
When the Valve Core or Complete Stem Needs Attention
The valve core is the small spring-loaded seal positioned inside the valve stem. It opens when an inflation nozzle is attached and closes again when the nozzle is removed. If dirt, corrosion, or wear prevents the core from closing correctly, air can escape directly through the valve opening. A confirmed core fault can often be serviced without removing the tyre from the wheel. However, the correct component and tool must be used because excessive tightening can damage the threads inside the stem. The valve should be checked again after replacement to confirm that it holds pressure correctly.
A complete stem replacement is more involved because the valve seals against the wheel from the inside. The tyre bead normally needs to be released so the damaged valve can be removed and the valve hole inspected. Cracked rubber, severe bending, corrosion, or leakage around the base usually means the complete stem or sealing assembly requires replacement. The new valve must be compatible with the wheel and any tyre-pressure monitoring system fitted to the vehicle. Once installed, the tyre should be reinflated to the recommended pressure and checked for further leakage. Balancing may also be required if the tyre has been removed or significantly disturbed during the repair.
TPMS Service Parts Versus a Complete Sensor
A TPMS-connected valve may contain several serviceable parts around the electronic sensor. These can include the valve stem, grommet, washer, retaining nut, and other sealing components. When one of these parts deteriorates, a technician may be able to replace the appropriate service kit while keeping the working sensor. This is important because drivers often hear the phrase “TPMS valve replacement” and assume the whole electronic unit must be changed. That is not always the case. The correct repair depends on the system design, condition of the valve, and exact location of the leak.
The complete sensor may need replacement when its internal battery has expired, its electronics have failed, or the assembly has suffered physical damage. Some replacement sensors also require programming, relearning, or calibration before the vehicle can recognise them. Replacing only the external valve will not repair failed electronics. In the same way, fitting a new sensor will not fix a separate puncture, bead leak, or damaged wheel. The technician should clearly explain which component has failed before beginning the work. This protects the driver from paying for expensive parts that are still functioning correctly.
Does a Leaking Valve Mean the Tyre Needs Replacing?
A leaking valve does not automatically mean the tyre must be replaced. If the tyre is structurally sound, has suitable tread depth, and has not been driven while severely underinflated, it may remain usable after the valve fault is repaired. This is often a welcome surprise for drivers who expect every pressure issue to require a new tyre. The tyre and valve perform different jobs, even though they work together to maintain pressure. Replacing the faulty valve may restore the seal when the tyre itself remains in good condition. A complete inspection is still necessary before making that decision.
The situation changes when the vehicle has been driven on a soft or flat tyre. Low pressure allows the sidewall to flex excessively and creates heat inside the casing. The outside may still look normal while the internal sidewall has become scuffed, weakened, or separated. A tyre may also need replacing when a non-repairable puncture, damaged bead, sidewall cut, or exposed cord is discovered. In those situations, valve replacement alone would leave an unsafe tyre on the vehicle. Mobile Tyre Giant can provide mobile tyre replacement when inspection confirms that the existing tyre should not return to service.
When the Existing Tyre Can Stay in Service
The existing tyre may remain suitable when the leak is limited to the valve and no structural damage is found. Its tread should remain legal and evenly worn, while the sidewalls should be free from cuts, bulges, and exposed cords. The bead must also seal properly against the wheel rim. If the tyre retained sufficient pressure and was not driven flat, internal damage is less likely. After the valve repair, the tyre should hold the manufacturer’s recommended pressure without further loss. A later pressure check can confirm whether the repair remains successful.
The technician should not judge the tyre only by looking at its exterior. Internal inspection may be required when pressure became extremely low or the driver continued travelling after the warning appeared. Dark scuffing, loose rubber particles, or damaged cords inside the tyre can show that excessive flexing occurred. These signs may be invisible while the tyre remains mounted on the wheel. Recommending replacement in this situation is not an unnecessary attempt to increase the repair cost. It is required when the casing can no longer be trusted to support the vehicle safely.
Does a TPMS Warning Mean the Valve or Sensor Has Failed?
A TPMS warning does not automatically confirm tyre valve failure. The system may simply be reporting that one tyre is below the required pressure. A tread puncture, leaking bead, damaged wheel, or temperature-related pressure change can also trigger the dashboard warning. Direct TPMS systems use electronic sensors inside the wheels, while indirect systems estimate pressure changes through wheel-speed information. Because these systems operate differently, the same warning symbol can have several possible causes. Actual tyre pressures should always be measured before replacing either the valve or the sensor.
The behaviour of the warning may provide useful clues, but the exact meaning depends on the vehicle. A steady warning commonly indicates low pressure, while a flashing warning followed by continuous illumination may suggest a system malfunction on some models. Even then, proper diagnosis is needed before blaming the sensor battery or electronics. The warning could remain active because the system has not been reset, relearned, or calibrated correctly. It may also be responding to a different tyre from the one the driver originally suspected. Replacing components without checking the complete system can waste money and leave the real problem unresolved.
Will Replacing the Valve Clear the Warning Light?
The warning may clear after a confirmed valve leak is repaired and the correct tyre pressure is restored. Some vehicles update the pressure information automatically after being driven, while others require a reset or relearning procedure. The correct process depends on the vehicle and the TPMS design. A technician should follow the appropriate manufacturer procedure instead of simply trying to switch the warning light off. Clearing the light without repairing the pressure loss would only hide the symptom. The pressure must remain stable before the repair can be considered complete.
If the warning remains illuminated after valve replacement, further diagnosis will be required. The sensor battery may be weak, the electronic unit may be damaged, or another tyre may still be losing pressure. Communication faults, calibration problems, and incorrect sensor programming are also possible. The valve repair should not be described as unsuccessful until these separate causes have been checked. Similarly, a new sensor should not be fitted solely because the warning light remains visible. Evidence from pressure checks and system testing should guide the next step.
Can Tyre Valve Failure Affect an MOT?
Tyre valve failure can affect an MOT when the damage creates a clear safety risk. A seriously damaged or misaligned valve that is likely to cause sudden deflation can be recorded as a dangerous defect. This is more serious than a missing cap or light surface weathering. The tester considers whether the valve remains secure and capable of maintaining the tyre’s pressure. An obviously underinflated tyre may also receive a defect because it cannot perform safely in that condition. Waiting until the MOT date to investigate repeated pressure loss is therefore a poor approach.
TPMS performance can also affect the test on applicable vehicles. A malfunctioning or obviously inoperative system may receive a major defect when the vehicle falls within the relevant testing requirements. However, the warning light alone does not reveal whether the valve, sensor, tyre, or another component has failed. The pressures and monitoring system should be diagnosed properly before the vehicle is presented for testing. Repairing the cause is better than attempting to reset the warning temporarily. Stable tyre pressure and a correctly operating monitoring system provide stronger evidence that the issue has been resolved.
Inspect the Valves Before the Test Date
Check every valve when reviewing the tyres before an MOT. Look for cracking, bending, corrosion, missing caps, and stems that appear to sit at an unusual angle. Measure the cold tyre pressures and investigate any wheel that loses more air than the others. Do not wait for the tyre to become visibly flat because a significant leak may already be developing. Early inspection gives enough time to replace a valve, repair a puncture, or address wheel corrosion. It also reduces the likelihood of an avoidable test failure.
Valve inspection should form part of a wider tyre-safety routine rather than a one-time MOT check. Tread depth, uneven wear, sidewall damage, and correct pressure affect safety throughout the year. Our complete tyre safety guide explains the other areas drivers should inspect regularly. Combining these checks with valve inspection makes recurring pressure problems easier to identify. The purpose is not simply to pass an annual test. It is to keep the vehicle safe and dependable between test dates.
Can Mobile Tyre Giant Replace a Tyre Valve at Your Location?
Mobile Tyre Giant can inspect tyre-pressure loss at a home, workplace, accessible car park, or suitable roadside location. This is especially useful when the tyre is too soft or damaged to drive safely to a garage. The technician can assess the valve core, valve stem, TPMS components, tread, sidewall, tyre bead, and visible wheel condition. If the fault can be repaired safely on-site, the appropriate valve or service components can be installed. If the tyre has also been damaged, a suitable replacement may be recommended. The final decision depends on the confirmed condition of the complete wheel assembly.
The vehicle must be located in an area that provides enough safe working space. A live traffic lane, blind bend, or unstable surface may make roadside work unsafe. Recovery to a more suitable location may be needed before the repair can begin. Drivers should explain whether the tyre is completely flat, whether the valve is hissing, and whether a TPMS warning is displayed when booking. Providing the vehicle registration and tyre size can also help the team prepare for the visit. You can review available coverage through the Mobile Tyre Giant service-area directory.
What Happens During the Mobile Inspection?
The technician should begin by measuring the tyre pressure and identifying where the air is escaping. A leak check may be carried out around the valve core, valve base, tyre tread, and tyre bead. Visible wheel corrosion, cracks, and impact damage should also be considered. If the tyre was driven while underinflated, internal inspection may be required before it is approved for further use. TPMS components must be handled carefully to avoid damaging a sensor that is still working. The driver should receive a clear explanation of the confirmed fault before replacement parts are installed.
Possible outcomes include valve-core replacement, complete valve-stem replacement, TPMS service-part replacement, puncture repair, bead resealing, or tyre replacement. Wheel damage may need a separate specialist assessment or vehicle recovery. This range of possible outcomes explains why describing every pressure problem as a puncture is inaccurate. A trustworthy mobile tyre service should diagnose the problem before recommending the repair. This reduces unnecessary replacement and gives the driver a safer result. It also helps prevent the same warning from returning after the technician leaves.
How Can You Reduce the Risk of Future Tyre Valve Failure?
Regular pressure checks are one of the easiest ways to identify valve problems early. Measure the tyres while they are cold and compare the readings with the vehicle manufacturer’s recommended figures. If one tyre repeatedly loses more pressure than the others, arrange an inspection instead of accepting frequent top-ups. Keep suitable valve caps fitted so dirt and moisture cannot collect around the core. Look for visible cracking whenever an inflation hose is attached, but avoid pulling the stem sideways. A few seconds of careful observation can reveal deterioration before the tyre becomes flat.
The valves should also be assessed whenever the tyres are changed. Standard rubber valves are commonly renewed during tyre fitting because their remaining condition may not match the life of the new tyre. TPMS-connected valves require compatible service parts and careful installation. Ask the technician exactly what has been replaced rather than assuming the entire electronic sensor has been changed. Avoid inflation equipment that pulls heavily against the valve stem. Most importantly, treat repeated pressure loss as a fault requiring diagnosis, not an ordinary feature of vehicle ownership.
Practical Tyre Valve Maintenance Checklist
Keep a reliable tyre-pressure gauge in the vehicle and use it regularly. Replace missing or damaged valve caps with suitable caps that fit securely. Remove visible dirt from around the valve without pushing contamination into the opening. Watch for corrosion on metal stems, especially after winter driving or exposure to road salt. Mention recurring pressure loss whenever the vehicle receives tyre or wheel work. These simple habits make changes easier to identify before they develop into emergencies.
Do not use improvised tools, random sealants, or excessive force on the valve core. Avoid bending the stem in an attempt to locate a leak because this can enlarge an existing crack. If a bubble test suggests leakage, note where the bubbles appeared and arrange professional inspection. Remember that the valve may not be the only cause of pressure loss. Checking the tyre, bead, valve, and wheel together produces a more dependable result. Prevention helps, but acting promptly when symptoms appear remains more important.
Final Words: Do Not Ignore Repeated Tyre Pressure Loss
Tyre valve failure can begin with something as subtle as a pressure warning returning every few days. The leak may come from the valve core, stem, base seal, or TPMS components, but punctures and wheel faults can produce similar symptoms. This is why proper diagnosis matters more than guessing which part needs replacing. A slow leak should not become normal through repeated inflation. If the tyre becomes soft, flat, or unstable, stop driving and arrange assistance. Acting early may allow the original tyre and TPMS sensor to remain usable.
Mobile inspection provides a practical solution when the vehicle should not be driven. A technician can assess the valve, tyre, bead, and wheel at the vehicle’s location where working conditions are safe. The final repair may involve a small valve component, complete stem, TPMS service parts, or replacement tyre. What matters is correcting the confirmed fault before it causes further damage. Repeated pressure loss is the warning sign. A complete inspection provides the answer.
Is Your Tyre Valve Leaking?
Share your location, vehicle details and tyre size to arrange professional mobile inspection, valve replacement or tyre assistance at a safe and accessible location.
Frequently Asked Questions
Find quick answers to the most common questions our customers ask.
Yes. A loose valve core, cracked stem, corroded metal valve or damaged base seal can release air gradually, creating pressure loss that feels exactly like a slow tyre puncture slowly.
Repeated pressure loss, hissing, visible cracking, corrosion or bubbles around the valve core or base can indicate leakage, although the tyre, bead and wheel still require proper inspection by technicians.
Do not drive if the tyre is visibly soft, flat, unstable or losing pressure quickly. Even a slow leak needs prompt inspection because underinflation can damage the tyre internally later.
Sometimes. A faulty valve core may be replaced separately, while cracked stems, damaged base seals or corroded TPMS valves usually require fuller replacement and access behind the tyre bead safely.
Not always. A structurally sound tyre may remain usable after valve repair, unless it was punctured, driven underinflated, damaged internally or affected by sidewall, bead or tread damage elsewhere too.
No. The light may indicate genuine low pressure, a puncture, leaking valve, failed seal, sensor fault or calibration problem. Actual tyre pressures should be checked before replacing components by professionals.
The valve core is externally accessible, but replacing the stem or base seal normally requires releasing the tyre bead. TPMS assemblies require careful handling to avoid sensor damage during service.
No. Sealant is not a dependable repair for a cracked stem, faulty valve core, damaged base seal or corroded TPMS valve, and it may complicate professional diagnosis and repairs afterwards.
One failed valve does not automatically require four replacements. The remaining valves should be inspected for similar ageing, cracking or corrosion, especially when tyres are already being changed or serviced.
Yes. A seriously damaged or misaligned valve likely to cause sudden deflation can receive a dangerous defect, while applicable vehicles may fail for an obviously malfunctioning TPMS system during testing.